
In summary:
- Effective waterfront audio isn’t about volume; it’s about strategic microphone placement and wind protection to ensure clarity.
- Every environmental factor, from tides and salt spray to sand and humidity, must be treated as a technical problem with an engineered solution.
- The success of a coastal wedding depends on proactive environmental management, not romantic wishful thinking.
- A robust contingency plan (Plan B) requires the same level of design investment and detail as your primary plan to feel like an upgrade, not a compromise.
The number one fear for couples planning a waterfront ceremony is that their guests won’t hear their vows. The sound of crashing waves and persistent wind, while romantic in theory, can become your greatest audio adversary. The common advice is to simply « get a good sound system, » but this fails to address the core physics of the problem. As an outdoor event director, I can tell you that brute force—simply turning up the volume—only creates a louder, more distorted mess. The real solution lies in treating your ceremony not as a party, but as an outdoor production that requires environmental engineering.
The challenge of being heard is just the tip of the iceberg. A successful coastal event requires a systematic approach to managing every elemental force: the wind that topples decor, the tide that steals your beach, the salt air that corrodes equipment, and the sand that infiltrates everything. Most planning guides offer superficial tips. This guide, however, takes a technical director’s approach. We will deconstruct the key physical forces at play and provide system-based solutions to control them, ensuring your event is a flawless production, not a casualty of nature.
This article will guide you through the critical engineering decisions that transform a high-risk coastal setting into a controlled, comfortable, and unforgettable experience. We’ll analyze everything from the aerodynamics of your centerpieces to the structural integrity of your tent, giving you the framework to anticipate and solve problems before they arise. Let’s dive into the technical specifics.
Summary: A Technical Guide to Mastering Coastal Wedding Elements
- Why tall centerpieces are a disaster for coastal receptions?
- Tides and sunsets: The two factors that dictate your ceremony start time
- Sand vs. decking: Which surface is best for a seated dinner?
- The salt air risk that can ruin your live band’s equipment
- How to keep guests sand-free during a beach formal event?
- How to humidity-proof your wedding look in tropical destinations?
- Plan B logic: How to make a rain plan that doesn’t feel like a compromise?
- Pole tent vs. frame tent: Which structure suits your land best?
Why tall centerpieces are a disaster for coastal receptions?
From a structural standpoint, a tall, slender centerpiece on a waterfront table is an accident waiting to happen. The combination of a high center of gravity and significant surface area makes it extremely susceptible to wind load. Even a moderate coastal breeze can exert enough force to topple it, creating a dangerous and costly domino effect across your tables. In fact, many wedding planners warn that tall glass centerpieces can become dangerous projectiles in these conditions. The goal isn’t to eliminate florals but to re-engineer their design for stability.
The solution is to lower the center of gravity and reduce the wind profile. Instead of thinking vertically, think horizontally. A « tablescape » approach, featuring sprawling greenery, clusters of low-profile arrangements, and weighted elements, achieves a lush aesthetic without the structural risk. Heavy materials like stone, thick ceramic, or metal for vessels are not just stylistic choices; they are ballast against the wind. Candles should be housed in heavy, tall-sided hurricane lanterns with thick pillar candles, which are far more stable and wind-resistant than delicate taper candles.
This low-profile design philosophy extends beyond just florals. Loose paper items like menus or place cards are liabilities. Opt for heavier materials like acrylic, stone, or wood. By analyzing each tabletop element for its aerodynamic stability, you shift from hoping for calm weather to engineering a tablescape that can withstand the reality of a coastal environment.
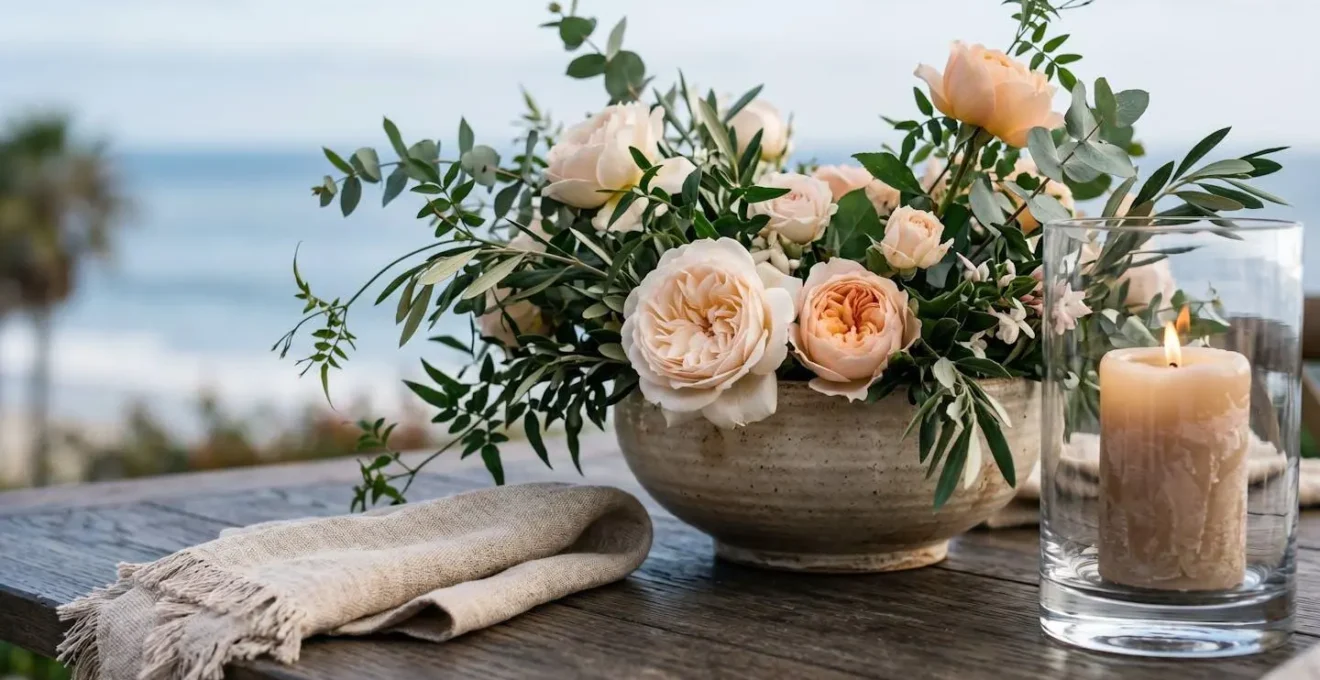
As this image demonstrates, a sophisticated and wind-resistant design relies on a low center of gravity. The heavy, wide vessel provides a stable base, while the sprawling greenery creates a lush look without presenting a large vertical surface for the wind to catch. This is a design that works with the environment, not against it.
Tides and sunsets: The two factors that dictate your ceremony start time
While sunset provides the « golden hour » for photography, the tide is the non-negotiable factor that dictates the very existence of your event space. Scheduling a beach ceremony without a thorough tidal analysis is one of the most critical errors in waterfront event planning. A beautiful, wide expanse of sand at 2 PM can be completely submerged by 5 PM during a high tide, leaving no room for your ceremony, your guests, or your equipment. This isn’t just about getting your feet wet; it’s a fundamental issue of spatial availability and safety.
As wedding planner Laura Kaatze notes in a guide for The Knot on beach wedding planning, this is a primary consideration.
Check tide charts to determine exactly when and where your beach ceremony should take place to avoid an unexpected flood at high tide.
– Laura Kaatze, The Knot – Beach Wedding Planning Guide
A professional approach involves more than a quick Google search. You must analyze official tide prediction charts for the specific date and location, paying close attention to the difference between neap tides (smaller tidal range) and spring tides (larger, more extreme range). Your ceremony should be scheduled during a mid-to-low or receding tide to ensure maximum beach space and dry ground. Furthermore, you must assess the entire « tidal journey, » considering how high tide might affect guest parking areas or access paths, potentially trapping vehicles or stranding guests.
Expert tide chart analysis checklist
- Use NOAA (National Oceanic and Atmospheric Administration) tide prediction charts for your specific beach location.
- Identify neap tides (smaller tidal range) vs. spring tides (larger range) and avoid scheduling during spring tide periods.
- Check tide timing to ensure mid-to-low tide during the ceremony for maximum beach space and access.
- Assess the entire ‘tidal journey’ including parking areas, access routes, and potential seaweed/debris deposits at high tide.
- Factor in local geography effects—coves retain water differently than open beaches—and monitor storm surge forecasts 48-72 hours prior.
Sand vs. decking: Which surface is best for a seated dinner?
The romantic idea of a dinner with toes in the sand quickly collides with the practical realities of physics and guest safety. Sand is an inherently unstable surface. Chairs sink unevenly, creating hazardous, slanted seating that is uncomfortable for everyone and downright dangerous for elderly or mobility-limited guests. Tables wobble, spilling drinks and creating a constant source of frustration. From a logistical perspective, sand is an abrasive enemy to rental equipment and a nightmare for service staff navigating with trays.
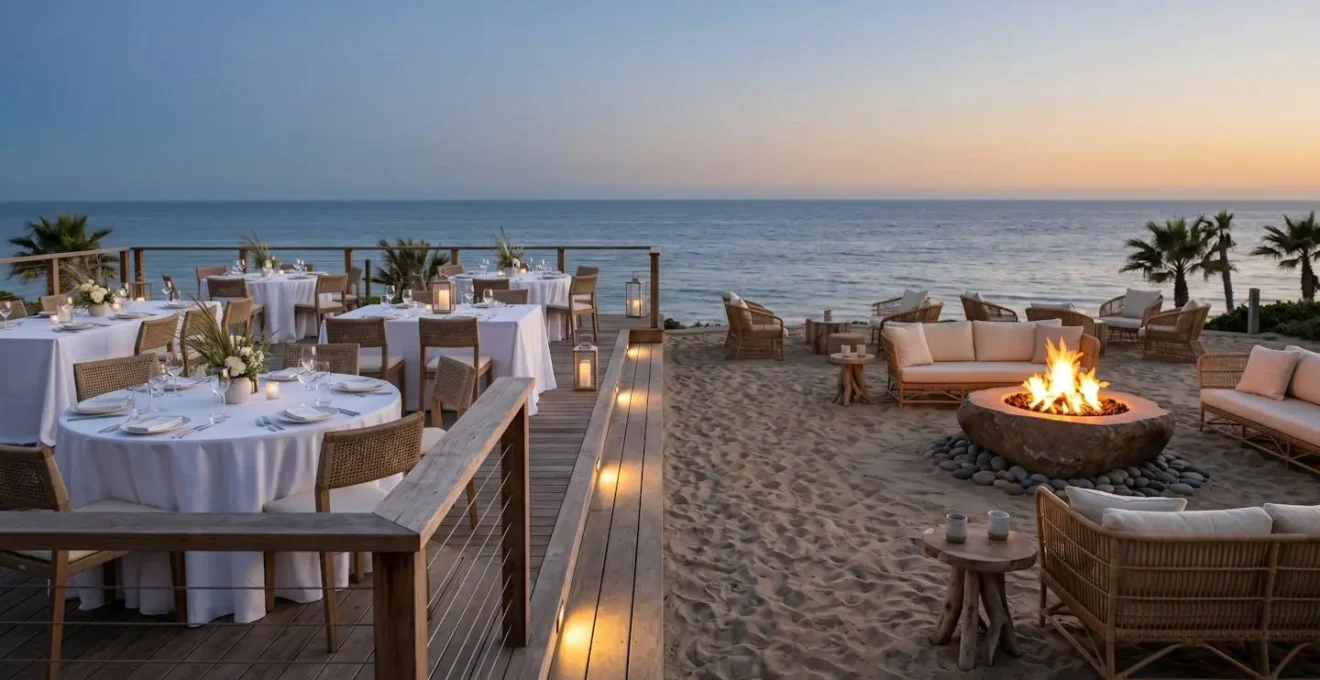
A temporary deck or flooring platform is the superior technical solution for any seated, formal function on a beach. It provides a stable, level foundation that ensures guest comfort and safety. It eliminates the hidden costs associated with sand, such as the need for a professional subfloor for a dance area and potential damage fees for salt- and sand-corroded rental items. While it may seem like an added expense, it solves a dozen other problems proactively.
The optimal strategy is often a hybrid approach. Use decking to create clearly defined, functional zones for the critical components: dining tables, bar service, the band or DJ platform, and the dance floor. This creates a safe and functional core for your reception. Then, preserve the natural sand for more casual, aesthetic zones like a lounge area with low seating, a fire pit, or photo backdrops. This « best of both worlds » design delivers both the romantic beach aesthetic and the operational integrity of a professionally managed event.
This comparative analysis breaks down the key considerations when choosing between a sand or decking surface. As a recent analysis on outdoor wedding planning shows, the foundation is everything.
| Factor | Sand Surface | Decking Surface |
|---|---|---|
| Guest Comfort & Safety | Unstable footing, chairs sink unevenly creating hazardous slanted seating, especially risky for elderly/mobility-limited guests | Stable, level surface, safe for all guest demographics, ADA-accessible |
| Hidden Costs | Requires professional subfloor for dance area, extra labor for equipment hauling/leveling, potential damage fees for sand-abraded and salt-corroded rental items | Standard setup costs, no special subfloor needed, equipment protected from abrasion |
| Aesthetic Integration | Romantic beach authenticity, natural setting, barefoot-friendly for lounge zones | Polished, elegant look, can be decorated with runners/lighting, defines event space |
| Functional Zones | Best for lounge areas, fire pits, casual cocktail spaces, photo backdrops | Optimal for dining tables, bar service, band/DJ platform, dance floor |
| Hybrid Strategy | Use decking for functional zones (dining, bar, dance) while preserving sand for aesthetic/lounge zones (fire pits, low seating) – ‘best of both worlds’ design | |
The salt air risk that can ruin your live band’s equipment
Salt air is not just a gentle breeze; it’s a highly corrosive aerosolized mixture of saline moisture and microscopic salt particles. For sensitive electronics, it’s a catastrophic threat. This is a material science problem that many couples and planners overlook until it’s too late. The most vulnerable components are those with delicate, exposed electronics, and the damage can be immediate and irreversible. A live band’s performance, and their very expensive gear, is at extreme risk without proper mitigation.
The failure point analysis is critical here. Microphone diaphragms are acutely sensitive; salt moisture can cause immediate short-circuits. Open-backed speakers and amplifiers act like vacuums, pulling corrosive particles deep into their internal components. Mixing boards, with their countless faders and jacks, are a minefield of potential corrosion points. Any professional vendor with coastal experience should have a « Coastal Rider » in their contract, specifying their requirements for protection, such as covered staging and humidity-resistant power sources. If they don’t, it’s a major red flag that they lack the necessary field experience.
Case Study: Coastal Wedding Sound Equipment Protection
A prime example of vendor expertise comes from the professional string duo Cabo Strings. After a decade of performing at Los Cabos beach weddings, they developed a specialized protocol for protecting their valuable instruments and sound gear. Their system includes using specific wind-resistant setup configurations and proprietary techniques to ensure music clarity remains unaffected by salt moisture. This demonstrates the critical importance of hiring vendors who have engineered solutions based on extensive experience with harsh beachside conditions, rather than those who are experiencing them for the first time at your event.
Protecting the equipment requires a multi-layered strategy. All audio gear should be positioned on an elevated, covered stage, ideally within a tented area and as far from the direct spray of the surf as possible. Windscreens on all microphones are non-negotiable. Using protective covers for speakers and sealed connectors for cables can significantly reduce the risk of infiltration. This isn’t about being overly cautious; it’s about respecting the destructive chemical properties of the environment you’ve chosen.
How to keep guests sand-free during a beach formal event?
The « Beach Formal » dress code presents a logistical paradox: how to maintain an elegant, formal atmosphere when the ground itself is determined to cling to every shoe, hem, and cuff. The solution is not a last-minute basket of cheap flip-flops, but a systematically designed « Guest Sand Journey. » This involves mapping every transition point your guests will navigate and implementing a sand mitigation strategy at each one. It’s an exercise in contamination control, ensuring comfort and preserving the formal aesthetic you’ve planned.
The journey begins the moment they leave their car. Your sand management system should include:
- Transition Point 1 (Parking to Beach): Install elevated walkways, wooden boardwalks, or even simple seagrass runners from the parking area to the edge of the sand. This prevents the very first contact and keeps shoes clean for as long as possible.
- Transition Point 2 (Pre-Sand Entry): Before guests step onto the beach for the ceremony, establish a « shoe valet » station. This is where you can offer high-quality, comfortable alternatives like espadrilles or stylish sandals. Frame this as a luxury amenity, a thoughtful gift, rather than a desperate fix.
- Transition Point 3 (Ceremony to Reception): After the ceremony, as guests move to the reception area (especially if it’s on decking or indoors), create a « Luxury De-Sanding Station. » This should be more than a single brush. Provide comfortable benches, soft towels, brushes of various sizes, and even fresh water misters for rinsing feet.
- Transition Point 4 (Reception Entry): A final, smaller brush station right at the reception entrance, complete with a full-length mirror, allows for a final check and ensures no sand is tracked onto the dance floor.
By mapping and managing this journey, you reframe the sand problem. Instead of being an unavoidable nuisance, it becomes a series of thoughtful, service-oriented touchpoints that enhance the guest experience and demonstrate a high level of planning and care.
How to humidity-proof your wedding look in tropical destinations?
In a tropical or coastal setting, humidity and wind are not your friends when it comes to hair and makeup. The battle against frizz and flyaways is often a losing one. The most effective approach is not to fight the environment, but to apply an engineering mindset to your wedding look. This means choosing a style that is structurally designed to withstand, or even be enhanced by, the elements. It’s about strategic acceptance, not futile resistance.
For hairstyling, this means prioritizing structure and flexibility. Intricate braids and textured updos that are designed to incorporate a few loose strands look intentional and romantic, rather than messy. A « convertible » updo, which starts sleek for the ceremony and can be easily transitioned into a more relaxed, tousled look for the reception, is a brilliant piece of personal systems engineering. Trying to maintain a perfectly smooth, sprayed-in-place style is setting yourself up for disappointment. As one experienced professional notes, reality is key.
After 25 years and hundreds of beach ceremonies, the brides who loved their beach wedding planned for wind, cold, sand, and 60-90 minutes outdoors. The brides who were miserable? They expected Hawaii.
– Professional Beach Wedding Officiant, My SF Wedding – San Francisco Beach Wedding Reality Guide
The same principle applies to makeup. Work with a makeup artist experienced in tropical climates. They will use techniques like airbrushing and recommend long-wear, waterproof formulas. It’s also critical to have a « backup arsenal » on hand. Your touch-up kit isn’t an afterthought; it’s a vital part of your personal maintenance system for the day. Include extra bobby pins, clear elastics, blotting papers, and setting spray. The goal is to accept that your look will evolve with the day, and to have the tools ready to manage that evolution gracefully.
Plan B logic: How to make a rain plan that doesn’t feel like a compromise?
The most common advice for an outdoor wedding is to « have a rain plan. » This is also the most poorly executed advice. For most couples, Plan B is a depressing afterthought: a generic, undecorated indoor space that feels like a consolation prize. To create a rain plan that doesn’t feel like a compromise, you must apply the « Design Parity Principle. » This means your indoor contingency plan must be designed with the same level of budget, detail, and psychological investment as your outdoor Plan A from day one.
Implementing the Design Parity Principle involves several key actions. First is Financial Parity: allocate a real portion of your decor budget specifically to the Plan B space. Don’t assume you can just « move things inside. » Second is Detail Parity: create a full design plan for the indoor space, including a lighting scheme, a floor plan, and a decor strategy. This plan should exist on paper, just like your primary plan. This psychological investment is crucial; when you have a beautiful design board for your indoor option, it starts to feel like a fantastic alternative, not a failure.
The final step is to design « Indoor-Only Wow Factors. » Embrace the advantages of being indoors. You can implement dramatic theatrical uplighting, hang intricate floral installations from a fixed ceiling, or create a cozy « hot toddy and pashmina » station—things that are impossible to execute outdoors. This reframes the narrative. You’re not losing the ocean view; you’re gaining an intimate, romantic, and cozy atmosphere where every guest is comfortable and can hear every word without environmental interference. It becomes an exciting choice, not a reluctant retreat.
Key takeaways
- Structural Integrity Over Aesthetics: Prioritize low-profile, weighted designs for all decor to combat wind load.
- Master Your Timeline: Your event schedule is dictated by tidal charts first, and sunset second. There is no negotiating with the tide.
- Engineer Your Surfaces: Use solid decking for all critical functional zones (dining, dancing, bar) to ensure guest safety and operational efficiency.
Pole tent vs. frame tent: Which structure suits your land best?
Choosing a tent for a coastal venue is a critical structural engineering decision, not just an aesthetic one. The two primary options, pole tents and frame tents, have vastly different anchoring requirements and wind-load capabilities. A pole tent, with its swooping, romantic peaks, is beautiful but relies entirely on being staked deep into the ground. This makes it unsuitable for hard surfaces like parking lots or patios, and a risky choice on soft, unstable sand where staking depth can be compromised.
A frame tent, by contrast, is a self-supporting aluminum structure. It offers far more versatile anchoring options, including water barrels or heavy concrete blocks, making it adaptable to any surface. Crucially, high-quality frame tents have superior certified wind-load ratings, as their rigid, engineered structure is designed to withstand the unpredictable and powerful winds common in maritime environments. This makes the frame tent the safer and more reliable choice for exposed coastal locations.
Beyond safety, the internal layout is a key differentiator. A pole tent has interior poles that must be incorporated into your floor plan, creating obstructions that can limit the placement of a dance floor, stage, or large head table. A frame tent offers a clear-span interior with no obstructions, giving you total freedom to design your layout. This allows for more creative lighting rigs, unobstructed sightlines, and a more modern, clean aesthetic.
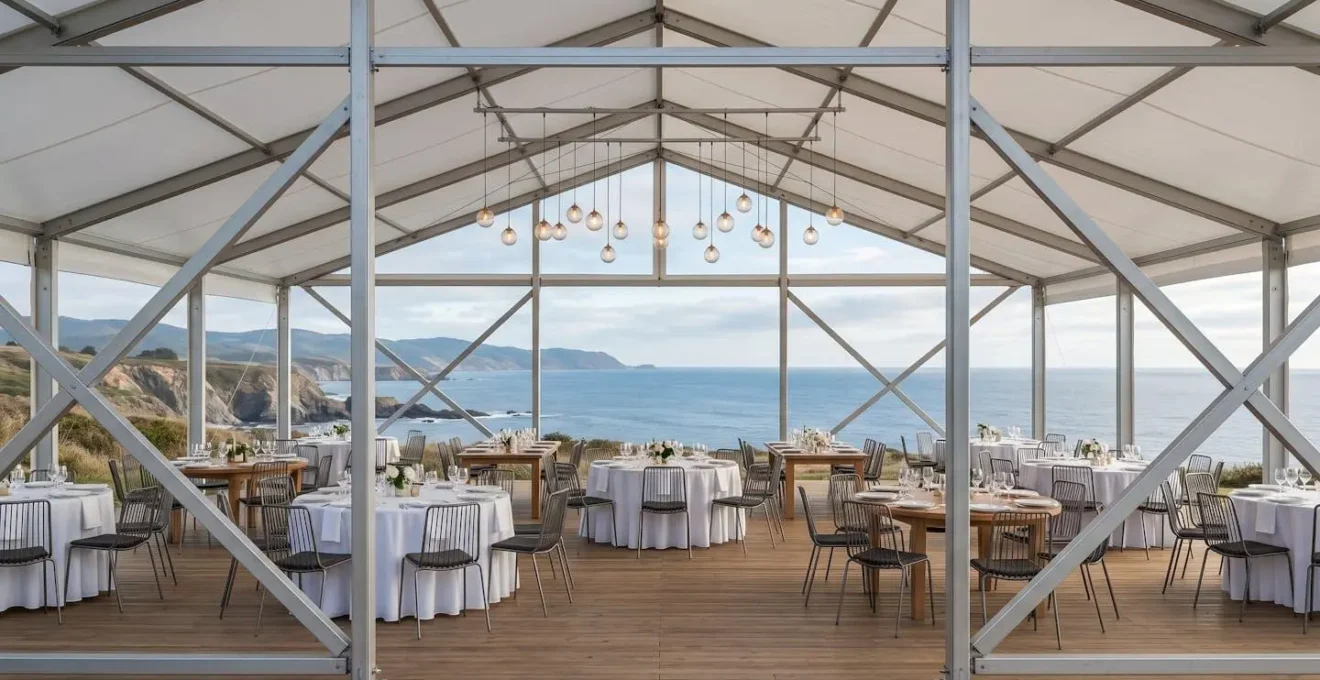
The following table provides a direct comparison of the features that are most critical for a coastal setting, highlighting why a frame tent is often the superior technical choice.
| Feature | Pole Tent | Frame Tent |
|---|---|---|
| Anchoring Method | Requires ground staking; not suitable for hard surfaces or locations where ground penetration prohibited | Can use water barrels, concrete blocks, or deck weights; versatile anchoring options |
| Wind-Load Safety Rating | Variable; dependent on proper staking depth and soil conditions | Superior certified wind-load ratings with rigid structure; engineered for high-wind coastal conditions |
| Internal Layout Freedom | Center poles must be incorporated into floor plan; limits placement of dance floor, stage, large tables | Clear-span interior offers total freedom for floor plans, staging, and lighting rigs; no obstructions |
| Aesthetic Profile & Vibe | Swooping, organic peaked roofline; creates romantic, classic, or bohemian atmosphere | Clean, geometric lines; lends modern, chic, or formal aesthetic; contemporary elegance |
| Design Integration | Tent itself becomes decor centerpiece; fabric draping essential to aesthetic | Neutral structural canvas; decor must create atmosphere; allows more controlled design |
| Coastal Suitability | Adequate for protected coastal areas with verified wind resistance specifications | Optimal for exposed coastal venues; engineered for unpredictable maritime weather conditions |
By adopting this technical, problem-solving mindset, you are no longer at the mercy of the elements. You become the director of your event, controlling each variable to produce a flawless experience. Your next step is to apply this engineering-focused scrutiny to every vendor you hire and every design choice you make, ensuring your coastal wedding is remembered for its beauty, not its logistical failures.